To get a better idea of the vignetting characteristics, and not having a proper optical opal glass, I improvised using some nice polyester drafting film I had laying around. I cut 2 pieces and sandwiched them between cardboard mats to create a nice white diffuse window about 3 inches in diameter. I aim the camera up at a dull gray overcast sky, place the diffuser on top of the lens hood, and shoot at the various apertures. This worked pretty well for a quick test.

Image 1 is an example of a shot using this technique with some post-processing to really draw out the shape of the light falloff. (In Photoshop I posterized the image and boosted the contrast.) This particular shot was using a 24 mm lens at f/2.8 on a Nikon D700 dSLR. It shows the expected radial light fall-off. It is this shape of light falloff that responds well to the mathematical corrections I described earlier. Also vignette tools in Photoshop and other image editors would handle this fairly easily if not quite as precisely.

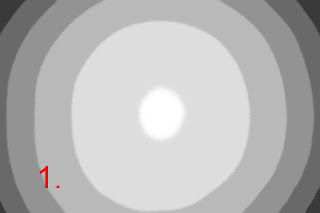
So, what's the problem with the G9? Take a look at image 2 which was shot with the G9 at 7.4mm focal length (the shortest of the zoom range) at f/2.8. It was processed in a manner similar to the other one to draw out the tonal structure. You can see the problems: the brightest part is not in the center of the image, there is less of the well-behaved radial symmetry seen in the first image, and the shape doesn't resemble the neat bullseye we saw earlier.
Sampling readings in various parts of the image show that each corner has a different tonal value (unlike the better-behaved first image). The lightest corner is more than 12% lighter than the darkest corner. These asymmetries make it impossible to use the mathematical technique, based on radial symmetry, that I was trying to use up to this point, at least not with best results.
The solution is to use this flatfield image (without the adjustments used for illustrative purposes) as an adjustment template to precisely match tonal corrections to actual system characteristics. A tool like the fulla command discussed extensively in earlier posts handles this nicely:
fulla -f flatfield_image target_image
We simply use a flatfield image shot at the same focal length and aperture as the target image and fulla will apply corrections to compensate for the vignetting characteristics no matter how odd they may be. Of course now this means that you need flatfield images for each of the focal length and aperture combinations you use. As I've mentioned earlier, this is a bit simpler for the G9 in that I only use f/4 or f/5.6, the sweet spot between lateral chromatic aberration and diffraction limits.
At this point, I've ordered some opal glass (not expensive) so I can do more careful flatfield images to get optimal corrections of vignetting.
So, what's the deal with the odd G9 characteristics? I don't know really. Based on this sample of one camera, I'm guessing that there are manufacturing variations and less-than-perfect alignment in the system but there are other possibilities in the engineering of the system that may help explain the odd behavior. By the way, the off-center vignetting asymmetry moves and changes shape slightly as you go through the zoom range. Go figure. I'll bet these kinds of variations are common in the compact and consumer class of cameras in general.
I have enough of a grasp on reality to know that this level of fussing is way beyond what most people feel there's a need for. Frankly I haven't lost a great deal of sleep over it either but it's fun to try to squeeze out the best images you can from what you're working with.


No comments:
Post a Comment