Friday, May 8, 2009

Vignetting Revisited

After enduring a little confusion and frustration in correcting some images from my Canon G9 camera, I investigated a little more and found that my process needs to be changed. A while back, in Part 2: Vignette Correction, I described a way to mathematically characterize and correct image vignetting. It was fine theoretically but, in practice, I found a little surprise.

To get a better idea of the vignetting characteristics, and not having a proper optical opal glass, I improvised using some nice polyester drafting film I had laying around. I cut 2 pieces and sandwiched them between cardboard mats to create a nice white diffuse window about 3 inches in diameter. I aim the camera up at a dull gray overcast sky, place the diffuser on top of the lens hood, and shoot at the various apertures. This worked pretty well for a quick test.


Image 1 is an example of a shot using this technique with some post-processing to really draw out the shape of the light falloff. (In Photoshop I posterized the image and boosted the contrast.) This particular shot was using a 24 mm lens at f/2.8 on a Nikon D700 dSLR. It shows the expected radial light fall-off. It is this shape of light falloff that responds well to the mathematical corrections I described earlier. Also vignette tools in Photoshop and other image editors would handle this fairly easily if not quite as precisely.
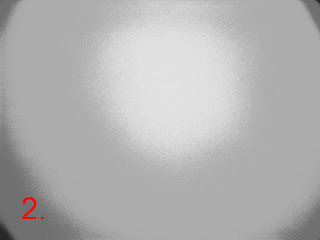

So, what's the problem with the G9? Take a look at image 2 which was shot with the G9 at 7.4mm focal length (the shortest of the zoom range) at f/2.8. It was processed in a manner similar to the other one to draw out the tonal structure. You can see the problems: the brightest part is not in the center of the image, there is less of the well-behaved radial symmetry seen in the first image, and the shape doesn't resemble the neat bullseye we saw earlier.

Sampling readings in various parts of the image show that each corner has a different tonal value (unlike the better-behaved first image). The lightest corner is more than 12% lighter than the darkest corner. These asymmetries make it impossible to use the mathematical technique, based on radial symmetry, that I was trying to use up to this point, at least not with best results.

The solution is to use this flatfield image (without the adjustments used for illustrative purposes) as an adjustment template to precisely match tonal corrections to actual system characteristics. A tool like the fulla command discussed extensively in earlier posts handles this nicely:


fulla -f flatfield_image target_image


We simply use a flatfield image shot at the same focal length and aperture as the target image and fulla will apply corrections to compensate for the vignetting characteristics no matter how odd they may be. Of course now this means that you need flatfield images for each of the focal length and aperture combinations you use. As I've mentioned earlier, this is a bit simpler for the G9 in that I only use f/4 or f/5.6, the sweet spot between lateral chromatic aberration and diffraction limits.

At this point, I've ordered some opal glass (not expensive) so I can do more careful flatfield images to get optimal corrections of vignetting.

So, what's the deal with the odd G9 characteristics? I don't know really. Based on this sample of one camera, I'm guessing that there are manufacturing variations and less-than-perfect alignment in the system but there are other possibilities in the engineering of the system that may help explain the odd behavior. By the way, the off-center vignetting asymmetry moves and changes shape slightly as you go through the zoom range. Go figure. I'll bet these kinds of variations are common in the compact and consumer class of cameras in general.

I have enough of a grasp on reality to know that this level of fussing is way beyond what most people feel there's a need for. Frankly I haven't lost a great deal of sleep over it either but it's fun to try to squeeze out the best images you can from what you're working with.

Tuesday, May 5, 2009

You and Your Metadata

Image metadata is a confusing and obscure topic but, in at least a few respects, it's an important one, even for those who don't have to be meticulous about metadata (like stock photographers). Let's look at the very basics you should know about and manage.

First metadata, or data about data, are pieces of information that are embedded in an image file. The major image formats (JPEG, TIFF, etc.) all have the ability to store the various categories of metadata. Metadata that can be stored in an image file include things like EXIF (technical information such as camera, lens, exposure, etc. when the shutter was clicked), ICC color profile, IPTC information (caption, description, author, keywords, etc.), XMP information (updated and more flexible version of IPTC types of information), thumbnail images, image comment, and others. Most of these major categories of metadata consist of multiple pieces of information and sometimes subcategories of information.

Metadata is placed into an image by your camera, the image editing software you use, and even by you explicitly. The metadata is used by other software that manipulates or displays images, and by people and organizations that need or want information about the image such as what the picture is, when it was taken, where it was taken, who owns it, who has rights to use it, and so on. There is very good practical information about metadata and other topics related to best practices in digital imaging at updig.org. UPDIG is a coalition of the major players in the industry who are establishing guidelines, standards, and recommendations for issues of managing digital images.

Software, such as image editing programs, are usually a bit confusing about which metadata they are managing and how comprehensively they do it. For example, some software will let you place an IPTC copyright field but not the newer XMP copyright. Some image viewers don't handle XMP data but will display a metadata comment. Software will often include metadata that you have no interest in, potentially bloating the size of the image file.

If you haven't yawned your way away so far, let's get to some practical basics. Anybody putting one of their images on the Web or licensing it for use should, at the bare minimum, include copyright and contact metadata (as well as ICC profile). This makes it easier for someone to find you if they are interested in your image and it helps protect your rights of ownership. Section 1202 of the Digital Millennium Copyright Act of 1998 outlaws, and specifies penalties for, the removal or tampering of identifying copyright ownership information in digital works. So, not only do you get to state your claims of ownership for your image, but image thieves can be prosecuted for violating your ownership or tampering with your copyright metadata. This also may be helpful in defending your rights that Congress is attempting to erode with various "orphan works" legislative proposals intended to aid their fat-cat buddies who don't want to pay big penalties when they violate your copyright.

So, let's say our objective with image metadata is to store our copyright and contact information and remove bloating metadata we have no interest in. One easy and comprehensive way to do this is through the use of Phil Harvey's excellent ExifTool, a Perl library that's available as a command-line tool on Windows and Mac platforms. I won't attempt to provide an overview of everything this powerful tool can do, but I'll give you an example of how I use it to achieve our goals of ripping out extraneous metadata and adding in our contact and copyright information.

Let's say you have an image named example.jpg and you wish to view the metadata that's already resident in the file:


exiftool -G1 -s example.jpg


This will display a (long) list of metadata names and values. It's quite interesting to see all the data stored in what looked like an ordinary image file.

To change the metadata to suit our purposes, we can use a lengthy list of command parameters or, more manageable, use a separate file with all of our command parameters that we tell ExifTool to use:


exiftool -@ mymetadata.txt example.jpg


The "-@" parameter tells ExifTool that the next parameter contains a list of all the command parameters we want to use against our image file. You can get my sample at http://pduncan.com/extras/mymetadata.txt. Edit it so it uses your information rather than mine and try running it on a file. Then use ExifTool to display the updated metadata using the command shown earlier.

If you notice at the bottom of the mymetadata.txt parameter file, I add the copyright statement into 4 places: EXIF, IPTC, XMP, and comment. This maximizes the chance that a given image viewer will recognize at least one of those.

The ExifTool command can, of course, be used to update multiple files:


exiftool -@ mymetadata.txt *.jpg


ExifTool is not the only way to do this work, and perhaps it's not the best for your workflow. The important thing is to find a way to tag your images appropriately that's easy and automatic for you.

Note we haven't covered image-specific metadata like captions, descriptions, keywords, etc. That's a whole other topic entirely.

Of course, none of what we covered here changes the need to register your images with the Copyright Office. It's easy, it's inexpensive, and it gives you the broadest set of options if you need to resort to legal action to protect your rights.

Update 6 April 2010: In a comment, Ed notified us of ExifTool updates that changed some of the example's parameters and he showed how to incorporate the file CreateDate to use as the copyright year. The above entry and example parameter file have been updated to incorporate the changes. Thanks Ed!

Thursday, February 26, 2009

Yay Me!

Bear with me for a moment while do a little self-congratulation. A while back I wrote a brief post called Night Sky Shooting which included an image of the Milky Way over Osgood Pond in the Adirondacks. For the heck of it, I submitted this image and a few others to the Adirondack Life magazine's annual photography contest. This image won the grand prize and is published full-page in the April 2009 issue of the magazine.

In addition, another image I submitted (Mossy Cascade Waterfall) won second prize in the color photo category.


I've been a subscriber to Adirondack Life magazine for many years; I've always admired the quality of the writing, design, and photography; but I never participated in their contest (or any other for that matter) until this past fall. So, as a first-timer, I'm quite pleased.

This concludes the self-congratulation blog post. Thanks for your indulgence.

Friday, December 26, 2008

Look Sharp!

Every once in awhile I come across images on the Web that look unusually crisp and sharp. But not in a bad way with obvious halos and other over-sharpening artifacts in images almost as common as those that look too soft. After tinkering with a few approaches, I've settled on a method that works well for me.

For a long time, I've been a big fan of PixelGenius's PhotoKit Sharpener, a suite of Photoshop tools for image sharpening based on the seminal work of Bruce Fraser and other authorities. Although I still use it exclusively for all sharpening aspects in my printing workflow, I've sometimes been less enamored of the results for Web sharpening.

Until recently, I used PhotoKit Sharpener to do capture sharpening and then used Photoshop's bicubic sharper algorithm for resizing down to Web territory. I've been relatively pleased with the results but looked around for a little extra boost.

After reading up on clinical comparisons of resampling algorithms (of which there are many more than offered in Photoshop), it seemed like there was a relative consensus that Lanczos, Sinc, and Catrom algorithms tended to do a better job than some of the others, including Photoshop's bicubic family.

I decided to try using the ImageMagick convert command to resize using the Lanczos filter. It's a command-line tool (which automatically turns many people off) with a huge and daunting set of often sparsely-documented options. But, after some Web research, here's what I ended up coming up with as my own starting point for down-sizing images for Web use:


convert -filter Lanczos -resize "500x500>" -density 96x96 \
-quality 80 -sampling-factor 1x1 -unsharp 0.6x0.6+1+.05 \
input_file_name output_file_name


This combination of command line options does the following:

-filter Lanczos
obviously selects the Lanczos resampling method from the many that ImageMagick supports.

-resize "500x500>"
indicates we want the down-sized image to be 500 pixels on the longest dimension. The ">" character indicates that we don't want to create a new image if the existing one is already that size or smaller.

-density 96x96
is just bookkeeping to indicate the image has a resolution of 96 ppi. It's not really necessary.

-quality 80
indicates the JPEG compression quality I want.

-sampling-factor 1x1
indicates the sampling factor for the JPEG compression. I don't know for sure, but this may be the default.

-unsharp 0.6x0.6+1+0.5
applies a little unsharp filter after the down-sizing. This is one of the most difficult areas to find useful information and guidelines on but this is what I came up with for 96 ppi display and it works well in most cases for me.

When I prep an image for Web use, I do the bulk of the work in Photoshop, convert to the sRGB color space (boo! hiss!) and save it as a TIFF file. Then I apply the convert command just described to create my Web-sized image. I actually have this command, and a couple others to handle IPTC copyrighting, etc., in a batch file that I just pass the TIFF file name to for processing.

Not every image will work optimally with this particular process but it's looking like a great starting point for my taste. Give it a try if you have ImageMagick installed. (It's available on all major platforms.)

Sunday, November 2, 2008

Faking Slow Exposures for Waterfalls

When shooting pictures of waterfalls, here's a way to get that soft milky look to the moving water when you can't get exposures long enough to do it directly. I recently had a pocket camera and pocket tripod in my coat pocket on a nice hike along a series of waterfalls in Ithaca, NY. I didn't have a polarizer or neutral density filter to enable slower exposures and this example was shot in open shade on a bright sunny day. I used the slowest ISO I had available (80) and closed the aperture as much as I could without destroying the image with diffraction. I was still stuck with a 1/30 second exposure giving the following result:


Not bad but I wanted the falling water to look softer. With the camera fixed on the little pocket tripod, I shot 5 identical exposures of the waterfall without moving the camera. I used the 2-second timer on each exposure to make sure my shutter-button presses didn't mess up the exposures.

I brought the 5 images into Photoshop on separate layers of one file. I wanted to blend the images together so that stationary objects stayed the same and the moving parts (the water) got averaged together. It's a simple matter of changing the layer opacities to allow each layer to contribute equally to the final composite. The background layer stays at 100% opacity, the second layer is at 50% opacity, the third at 33% opacity, and so on as seen here:


If you think about it a little bit, this allows each layer to contribute equally to the averaged stacked final image. Of course I could have used fewer or more images depending on what the desired outcome is but you get the idea. The result with 5 stacked images is much closer to what I was hoping for. Ten images would have made it really milky smooth.

Thursday, October 2, 2008

Night Sky Shooting

The current DSLRs are getting better characteristics making night sky photography viable: lower noise at higher ISOs and better long-exposure tolerance. Upon getting a Nikon D700, one of the first things I wanted to do was try out night sky photography like I used to do in the good old film days. You have two choices with long exposures of the night sky: either keep the camera stationary and get star trails or move the camera to compensate for the earth's rotation to get long exposures of faint sky features without smearing into trails.

It's the latter that I find most interesting usually. So, with a vacation based on a cottage overlooking a pond coming up, I hastily put together an equatorial mount to take night sky pictures if the weather cooperated.


An equatorial mount is simply a camera (or telescope) mount that allows you to rotate your gear precisely around an axis parallel to the earth's axis of rotation but in the opposite direction to compensate for the apparent rotation of the night sky as the earth turns.

You can build a primitive mount using some scrap lumber and some common hardware as I did. At its core, the mount is two boards joined at one end by a door hinge. The hinge is our rotation axis and will be aligned with earth's axis as described later. The bottom board is fixed in position so that it correctly aligns the hinge. At the end opposite the hinge on the bottom board we drill a hole through which a T-nut can be driven for a 1/4 X 20 bolt to be screwed in. (This means a bolt 1/4 inch in diameter with 20 threads per inch. The bolt should be at least 3 inches long.) In use we slowly (one revolution per minute) screw in the bolt so that it drives the upper board away around the hinge axis. This drive bolt is located 11.43 inches from the center of the hinge axis.

Here's why. (Math-phobes skip this paragraph, it will make your head hurt.) The earth completes one revolution every 23 hours, 56 minutes, and 4.1 seconds approximately. This is the sidereal or star day, not a solar day which is the familiar 24 hours, the extra four minutes of which are spent rotating a bit more to compensate for the earth's orbit around the sun. So, this means the earth rotates 360° every 23 hours, 56 minutes and 4.1 seconds or about 1436 minutes. That means the earth rotates about 0.25° every minute so we need to rotate the same amount in the opposite direction to compensate. Because we're using a bolt with 20 threads per inch, we can move our upper board 1/20 inch per minute. We need to find the distance between the hinge and the bolt that will cause the upper board to rotate 0.25° when we raise the far end 1/20 inch. Simple trigonometry shows that distance to be 0.05/tan(360/1436) or 11.43 inches. There's some heavy round off in these calculations but the error is well within our ability to drill holes with precision into lumber.

Next we need to mount our board assembly to keep our hinge axis in alignment with earth's. In my case, I knew I was going to be shooting pictures at 44° north latitude so the hinge needed to be angled up at 44°. I cut a couple of supports at this angle and screwed the bottom axis board to it. An adjustable setup would be better if you're going to use this at different locations. The angled supports were in turn screwed to a piece of plywood with a hole drilled in the center to thread a bolt through to secure the whole apparatus to a tripod. (You could simply set it on a level table top instead.)

The final tweak was to screw a piece of wood cut at 45° to the top rotating board to provide some elevation for mounting a ballhead and the camera, giving them clearance to point in any direction needed.

To align everything on site, it helps to have a compass and a good map that provides a couple of important pieces of information. You need your latitude so that the hinge can be angled up the proper amount, and you need the direction of true north that the hinge axis must be aligned with. Good maps, such as the USGS maps in the US, also include an indication of how far magnetic north deviates from true north. In my case, I was shooting at about 44° north latitude at a location where magnetic north was 14.5° west of true north. After adjusting the compass accordingly, I lined everything up beforehand, composed the approximate scene I wanted to capture, locked down the controls, and waited for dark. An alternative to all this is to eyeball along the hinge at night so it points in the direction of Polaris, the North Star, if you live in the northern hemisphere. In my case this wasn't an option because north was obscured by trees.

When shooting, keep a watch handy with a little light on it and use it to synchronize your rotation of the bolt with the seconds indicator of your watch—remember, we're screwing in the bolt at 1 complete revolution per minute. Trip your shutter and start slowly rotating the bolt and, if you've measured and aligned everything properly, you should get nice crisp star images.

Or not. As I found out, many wider-angle lenses don't do stars very well. There is a lot of coma and astigmatism that you don't notice in normal shooting. Experiment with lenses and f/stops to find the right combination to give you the best results.

In my case, I was getting good results at ISO 3200, 30-second exposures with a zoom set at 35 mm and f/4. I would shoot multiple exposures and then use stacking software to combine them to get nice clean (relatively) noise-free images.


Note that this solution is only accurate for a few minutes at a time, when the boards are closest together. As they rotate farther apart, the movement of the bolt pressing against the upper board has a progressively smaller effect on the rotation rate of the upper board. If you want a more robust solution, things get a lot more involved and you may want to simply buy a commercial equatorial mount (and maybe even a clock drive to turn it).

Update March, 2009: The image above, of the Milky Way over Osgood Pond in the Adirondacks, was the grand prize winner in the Adirondack Life magazine's annual photography contest. It was shot from the canoe house deck of the Gazebo, a gem of a rental cottage on the pond.

Sunday, September 14, 2008

Highs and Lows

I was at an arts and music festival helping out Lori with her pottery booth. I had a chance to wander around and shoot a few pictures. I brought the little Canon G9 and a monopod to get something other than the straight-on shots we instinctively go for.


One thing you can do is attach the camera to one end of the monopod on the side and then just rest that end on the ground and have the camera shoot upwards to get a ground-level view of the world.


Another easy way to get a different viewpoint it to fully extend the monopod and raise it high overhead to get a top-down view.

In both cases I find it convenient to simply set the camera at the hyperfocal distance (about 6.5 feet or 2 meters for the G9 at 7.4 mm set at f/5.6). Set the mode to aperture-preferred, put on a 5-second timer, click the shutter and either set the camera down or raise it high and wait for your 5-count to let you know the shutter has released.

It's not going to get you precision framing but you can get decent quality images from a seldom-used perspective. Also, if you're using a pocket camera, it's quite easy to move the camera into position at the end of the monopod and you won't attract quite as much attention as you would trying to wrestle a big DSLR into position to do the same thing.

(The only disturbing comment I got was from a woman who came from behind and, as she passed, said "Oh, thank God; I thought you had a gun." Maybe I should put some nice friendly colored electrical tape on my gun-metal grey monopod to reduce such anxieties.)

Vignetting Revisited

After enduring a little confusion and frustration in correcting some images from my Canon G9 camera, I investigated a little more and found ...