Showing posts with label Canon. Show all posts

Friday, May 8, 2009

Vignetting Revisited

After enduring a little confusion and frustration in correcting some images from my Canon G9 camera, I investigated a little more and found that my process needs to be changed. A while back, in Part 2: Vignette Correction, I described a way to mathematically characterize and correct image vignetting. It was fine theoretically but, in practice, I found a little surprise.

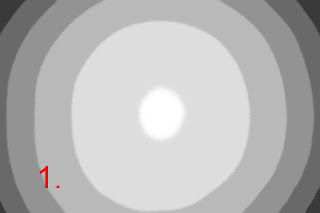
To get a better idea of the vignetting characteristics, and not having a proper optical opal glass, I improvised using some nice polyester drafting film I had laying around. I cut 2 pieces and sandwiched them between cardboard mats to create a nice white diffuse window about 3 inches in diameter. I aim the camera up at a dull gray overcast sky, place the diffuser on top of the lens hood, and shoot at the various apertures. This worked pretty well for a quick test.


Image 1 is an example of a shot using this technique with some post-processing to really draw out the shape of the light falloff. (In Photoshop I posterized the image and boosted the contrast.) This particular shot was using a 24 mm lens at f/2.8 on a Nikon D700 dSLR. It shows the expected radial light fall-off. It is this shape of light falloff that responds well to the mathematical corrections I described earlier. Also vignette tools in Photoshop and other image editors would handle this fairly easily if not quite as precisely.


So, what's the problem with the G9? Take a look at image 2 which was shot with the G9 at 7.4mm focal length (the shortest of the zoom range) at f/2.8. It was processed in a manner similar to the other one to draw out the tonal structure. You can see the problems: the brightest part is not in the center of the image, there is less of the well-behaved radial symmetry seen in the first image, and the shape doesn't resemble the neat bullseye we saw earlier.

Sampling readings in various parts of the image show that each corner has a different tonal value (unlike the better-behaved first image). The lightest corner is more than 12% lighter than the darkest corner. These asymmetries make it impossible to use the mathematical technique, based on radial symmetry, that I was trying to use up to this point, at least not with best results.

The solution is to use this flatfield image (without the adjustments used for illustrative purposes) as an adjustment template to precisely match tonal corrections to actual system characteristics. A tool like the fulla command discussed extensively in earlier posts handles this nicely:


fulla -f flatfield_image target_image


We simply use a flatfield image shot at the same focal length and aperture as the target image and fulla will apply corrections to compensate for the vignetting characteristics no matter how odd they may be. Of course now this means that you need flatfield images for each of the focal length and aperture combinations you use. As I've mentioned earlier, this is a bit simpler for the G9 in that I only use f/4 or f/5.6, the sweet spot between lateral chromatic aberration and diffraction limits.

At this point, I've ordered some opal glass (not expensive) so I can do more careful flatfield images to get optimal corrections of vignetting.

So, what's the deal with the odd G9 characteristics? I don't know really. Based on this sample of one camera, I'm guessing that there are manufacturing variations and less-than-perfect alignment in the system but there are other possibilities in the engineering of the system that may help explain the odd behavior. By the way, the off-center vignetting asymmetry moves and changes shape slightly as you go through the zoom range. Go figure. I'll bet these kinds of variations are common in the compact and consumer class of cameras in general.

I have enough of a grasp on reality to know that this level of fussing is way beyond what most people feel there's a need for. Frankly I haven't lost a great deal of sleep over it either but it's fun to try to squeeze out the best images you can from what you're working with.

Thursday, June 26, 2008

Introduction: Understanding and Fixing Compact Camera Images

This is the first of several posts where we'll look at the characteristics and problems with compact consumer digital camera images and work out ways to deal with them. I recently decided to dust off my panoramic tripod head and try it out with the Canon G9 compact consumer camera. Setting up the panorama head to get the entrance pupil of the lens centered on the horizontal and vertical axes was simple. More time consuming was measuring and automating the correction of the G9's images so that they could be used effectively for high-quality stitched images.

First, these are the assumptions going into this series. The average person won't go to the lengths discussed here to squeeze the most quality out of the camera's images. (But you aren't an average person). I'm using the Canon G9 camera as an example but the concepts and techniques apply to any digital camera in this class. Furthermore, for simplicity and because I'm doing this ultimately for use in wide-angle panoramas, I'll only discuss the shortest focal length (7.4 mm). The same issues and techniques apply to other focal lengths in the zoom range but let's not get too buried in detail. Finally, while some of this discussion is of most obvious use when the goal is trying to stitch images together, the techniques can be used to greatly improve single images as well.

Let's start by discussing sharpness and depth of field. If you're not familiar with the concepts, head on over to the superb tutorials at the Cambridge In Colour site and get acquainted with depth of field and hyperfocal distance concepts. Because of the tiny sensors in the compact consumer cameras like the G9, the depth of field is very deep compared to a dSLR, for example. I prefer to use the more conservative Leica proportional circle of confusion size for calculations. For the G9's size, the standard assumed circle of confusion size used to determine what is in focus is 0.006 mm but I'll use the slightly smaller 0.005 mm size for added insurance. At that size, and the 7.4 mm focal length lens set at its widest aperture (f/2.8) the hyperfocal distance is 12.7 feet. That means if you focus at 13 feet, everything from a little over 6 feet away to infinity will be in focus. And that's the shallowest depth of focus you can get in this camera! At f/4, the hyperfocal distance is 9 feet meaning everything from 4.5 feet to infinity will be in focus. That should suit all but the most extreme requirements for depth of field, but the G9 will go all the way to f/8.

The problem with going beyond f/4 is that the G9 (and similar cameras) is diffraction-limited at f/4. That means that if you close the aperture down smaller, you will get greater depth of field but the overall image sharpness will decline due to diffraction effects. There may be extreme cases where f/4 just isn't sufficient and you're willing to pay the price of the image degradation to get the extended depth of field. For me, however, I'm sticking with f/4 and focused at 9 feet for the bulk of my work with this camera. In fact, I've set the custom settings (C1 and C2 on the G9) to be aperture-preferred f/4, manually focused at 9 feet. I turn on the camera, dial to C1 and I'm set to get the sharpest images with the most depth of field without any more fuss. (Obviously if you're subject is closer than 4.5 feet you need to override this.) I set up the C2 custom set the same way but added a 2 second timer delay to the settings so that I can trip the tripod-mounted camera shutter and get my hands off before the shutter fires. That greatly reduces the chances of vibration blurring.

The following example image was shot at the shortest focal length (7.4 mm), widest aperture (f/2.8), and focused at the hyperfocal distance of 13 feet. The Cyclamen flowers 6 feet away are sharp, as are the leaves on the trees behind the house. Only the closest stretch of fence rail on the right is showing focus-blurring.


By the way, if you do frequently use the camera in closer and still need to manage the depth of field closely, go to www.dofmaster.com and get the DOFMaster Depth of Field Calculator program to make your own depth of field calculator. Using this a little bit is a real eye-opener when you see what happens when you change aperture or focus distance.

The next series of posts will explore analyzing and fixing the images that come out of the camera. We'll fix vignetting, lens distortion, and transverse chromatic aberration. Your images will look better than ever. Meanwhile, get familiar with hugin panorama photo stitcher software. It's free and, even if you never do panoramas, it includes a command called fulla that we'll be using to correct our image flaws. It's a command-line utility, not a windows program, but that works to our advantage to automate image correction.

Vignetting Revisited

After enduring a little confusion and frustration in correcting some images from my Canon G9 camera, I investigated a little more and found ...